
After a long summer, I’m so excited because
I know I posted way back when about the exciting reveal that was coming your way but then the kitchen debacle happened and it kind of derailed my plans by a couple of weeks months.
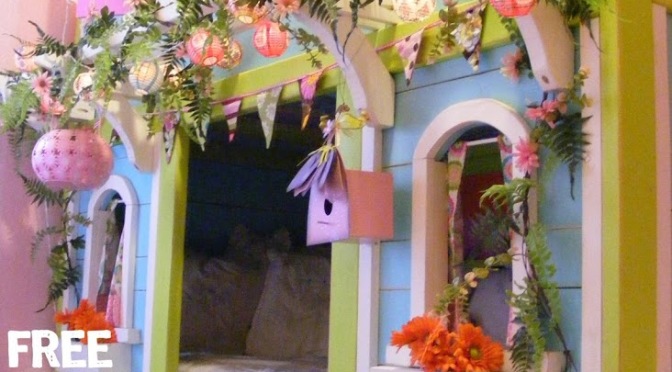
It has been a busy summer of building and I am excited to finally reveal my girls’ bunkbed! This isn’t your average bunkbed; no, no.. this bed is the stuff dreams are made of! I’m so excited to share it with you, because not only do I have pictures of this beautiful bed:

What? That did not just happen.
Oh yes, it did! Thanks to Ana White for helping make this dream bed a reality.

Earlier this summer, while I was in the middle of this build, I was doing my usual perusing of www.ana-white.com, and told my husband “Check out these people, Ana has folks contributing on her blog now, that would be so fun.” Sam said, “You could totally do that, Jenny!” and he suggested I email Ana right away and ask to be a contributor on her site (alright, he didn’t say “totally,” but it sounds better when I retell the story). So with his urging, I attempted to muster up the guts to message Ana…I would have to think on it for a little while. I’m kind of a wimp like that.
No joke, two hours later, I check my email, and guess what was in my inbox? A message from ANA WHITE, herself, asking ME if I would like to be part of her contributor program?!
Okay, I don’t know about many of you out there, but Ana’s “Kind of a Big Deal” around my house. Like celebrity status. I <3 her. I talk about her and her site, the“Momplex,”, and my latest to-do list from her plans all the time- you’d think she was my cousin or something. I’m surprised my kids don’t ask when she’s coming to visit, haha.
I knew I was crafty, but I didn’t know I could BUILD until I found Ana. She is absolutely inspiring, and really gave me the confidence to jump into the world of furniture making. I know I’ve gushed about her before on my blog, but seriously, if I could put her in my pocket and carry her around all day, I would do that. Is that weird?
Back to the story. I immediately responded to Ana and when she asked if I had any projects in mind I just happened to mention that I was right in the middle of a bunkbed build that was super fantabulous and I would love to share it if she could help me make it into a plan.
You see, I designed the bunkbed on Google Sketchup. It is an awesome and FREE program for building. It lets you design from the ground up; making boards, keeping track of dimensions, but most importantly, it gives you a great visual for how your project will come together. I loved this program over the winter, because it gave me an outlet for all my creative juices; I was able to design all of the projects that I couldn’t build outside in the crappy weather so they would be ready when the sunshine came.
Getting the Sketchup file into a plan is a whole other story. I am new at this program and there were many times I just wanted to throw my computer out the window because the learning curve was killing me! What took me over a month to design on Sketchup took Ana only days to break down into easy to read diagrams that went along perfectly with my instructions. I could have cried when she sent me the final draft.
Ah-Mazing!
So check out the plan- I’ve titled it “Sweet Pea Garden Bed.” “Sweet Pea” is an endearing term I use with my girls because they are just that sweet. My bed has a cottage garden feel to it, but it could easily be altered to suit a little boy. Less sweet, more rustic, and this could be one awesome hunting lodge! Ana even mentioned turning it into a firehouse- there really are endless possibilities when it comes to our kids. I hope that you will find the instructions easy to understand, and please don’t hesitate to ask should you find yourself knee-deep in a bunkbed build all lost and confused.
Here are the details of the build, you can find the full plan instructions Here.

When I started the bed, it was early spring. I was battling windstorms, rain, and snow. My garage is old and detached and has a flat roof (who does that?) so it leaks. My “workshop” is also known as my “driveway” and it’s only open when the weather cooperates. You know the neighbors gotta love that. If they’re not trying to eat dinner over the sound of my sander going or the air compressor refilling, then it isn’t a normal day on my block. I truly wish I had thought about blogging my build at the time, because I am a little low on pics for part of the construction process.
First, I purchased all of the wood at once. I WOULD NOT recommend this if you are building between raising kids all day. If you can bust this project out in a week or so, then it is no issue. However, for me, I could only work on it when I had free time during my kids’ naps or my husband’s days off. The wood sat in a pile on the side of my house through rain, direct sun, and all types of weather that are not friendly to lumber. I would suggest just buying materials for the bed first, then the stairs, storage boxes, etc. The storage boxes were my last project and it was three months before I finally got to them. By then, the wood was warped and problematic for construction.
There is a lot of wood here, and with it can come a pretty hefty price tag. I purchased some of the wood as “culled lumber.” This is wood that is slightly damaged, either warped, gashed, or split.You can find this in your lumber department of a big box store. My local Lowes has this out front. The culled lumber is banded together and you get what you get. You don’t get to pick pieces; sometimes it is just what you need (like a whole mess of 1x material), it is worth looking out for. I asked for discounts on several individual boards that looked great except on one end or a couple of feet that were in bad shape that I knew I could salvage. The cashier obliged and I got a deal- it never hurts to ask!
The board that I cut arches in on the upper front panel was warped pretty bad, shouldn’t have been so cheap on that one. I found that it would have been better to use straight boards on the long sides of the bed. You can see the warping at the top (however, the adorable shutters cover it right up!).

I recommend pre-cutting, priming and painting as many pieces as you can ahead of time to make assembly go much smoother. Except for the 1×2 trim, which you will want to cut to fit (you can paint it, though!), the majority of the pieces can be cut ahead of time. I had my nieces come over one afternoon and help me paint- it was a lifesaver!


When it comes to paint, I have to say, Lowes has revolutionized my DIYing, furniture-crafting self! I absolutely L-O-V-E their sample-sized paint jars. I find that one or two little jars is often enough for a small project and I don’t have to buy a whole quart or gallon. For this project, it really allowed me to add a lot of color to the design without spending a fortune on paint. The jars are 7-8 ounces and will run you $2.97 each (For the record, the cheapskate in me has to share: There are 32 ounces in a quart. My local Lowes charges $12.97 for a quart of paint. It is slightly cheaper to buy four sample-sized 8 ounce jars @$2.97 than purchasing a quart. boom.)

And yes, my husband does work at Lowes, but they certainly aren’t paying me to plug them. I just love their paint!
*Lowes, if you want to pay me to plug you, send me an email! Haha.
Just in case you are wondering, the colors I chose for the bed are as follows:
Frame: Valspar’s Parsley Sprig. 6008-8B It’s a vibrant, punchy green.
Siding: Valspar’s “Sea Wave” 5006-9C this is a perfect shade of “Tiffany Blue” I also used it on my niece’s bedroom makeover.
Shutters and Stair Railing: Valspar’s “Raspberry Sorbet” 1001-1B
Storage Box Fronts: Valspar’s “Organic Garden” 6005-6B with a little “Twilight Meadow” 5007-8A (pictured above) added to the mix to paint the grass.
The white trim is my go-to shade of Antique White. I use this everywhere in my house on moldings, wainscoting, and also on furniture. It’s my fave. It’s called “Heirloom Lace” by Olympic (also from Lowes). It’s fresh and crisp, without the cold starkness that makes you feel like you are in a hospital.
The rest of the colors I used were mis-tints I purchased at a discount.

I chose a distressed finish for the bed. It fit with the look I was going for, and honestly, you’d be a fool not to distress anything that goes in a kid’s room. They are rough on furniture! I lightly sanded the edges and knots to bring out the character of the wood.
When it came to assemble the bed, I made several mistakes along the way. I found myself having to rework the plan as I went. For instance, my stair railing was put together completely different than the official plan. That’s because I made it way harder for myself than it needed to be. I had to redesign that part so that you poor unsuspecting folks wouldn’t throw it in the trash because it turned out looking like junk when you were all through.
Starting with the front panel, it was a little tricky figuring out how to cut the arches from the window frames. Then I got looking around my driveway and found the answer:


I used the bottom of a plastic flower pot I had laying around to trace the arch. I marked my board for the window opening and lined up the edges of the pot with my marks and traced the arch. Once you cut out your first arch, use the scrap to trace the next one. I did NOT do that and my arches ended up different sizes. Not too noticeable, but it caused problems when I built the shutters. One set was larger then the other and I had to fit them differently to make them look even. Learn from my mistake and trace the second arch off the first!
Once I had the top board in place, I lined up my boards along the edges of the frame and nailed them to the trim. This pic is the view of the rear of the front panel as I was assembling it. On the two boards below the windows, I glued them together and used my nailgun to toenail them in place. You could also add a few pocketholes here to make the panels solid. I noticed that with the boards spanning the entire length of the bed, they could use a little reinforcing so they wouldn’t sag or bow.

The window sill notches are cut with a jigsaw too. If your notches are a little choppy looking when you are done, don’t fret, the window trim will hide any unevenness when it is finished out. Glue them into place and nail to the panel pieces.

Here is a better shot of how the panel pieces are attached to the frame. As the trim is attached to each frame piece, it creates a lip to lay the panel pieces across. This is a lower window section. When your pieces are pre-cut and painted, it assembles quickly like a puzzle. All of the nails are on the backside giving a nice, clean look to the front.

The front panel pieced together quickly, but the rear panel went even faster! The entire panel is essentially siding. I did go through a million pockethole screws piecing it together, however. When you have these long running boards, they tend to want to sag and bow beneath the weight of themselves. To remedy that, I screwed them together on the back sides with vertical pocketholes and glued them along the edges to make one large upper and lower panel to affix to the rear frame.
For the upper portions of the panels (above the shelves), I pieced them together with scraps. This saved on cost and also waste. Instead of a large scrap pile, I painted my scraps, distressed the edges, and pieced them together on end with pocketholes and glue. I ended up with a great color-blocking effect using several random colored boards to create each row. This added some fun to the inside of the bed providing a nice contrast from the main body of the bunkbed. The rear panel is very heavy, don’t give yourself a hernia trying to move it yourself. I jest, but this sucker weighs a ton!


The cat loves it in there.
And this is where I stopped taking photos! Ack! Be sure to read through the full plan, and message me if you have any questions. Thanks for stopping by!
Stay tuned for detailed posts on the roof, pergola, stairs and storage boxes.
Linking up and partying over here:


Great job on the bed! From someone that has taken on a big bed project, I did the Fire Truck Bed, I know the time that goes into it! The bed looks great and my sister has already put in a request for my nieces to have that in the future. Also, congrats on being a contributor to Ana's site, I have done a few things, just wish I had the time to do more. Take care and look forward to seeing
Thanks so much! Your firetruck bed is awesome! I can't wait to see the bed when you finish it for your nieces. Be sure to post pics, I'm really curious how the build goes for the next victim, haha.
Wow Jenny!!! I am so amazingly impressed! I love it and you did a fab job with the plans. I agree with you 100% on Ana being a celeb, she is in my book and I must admit I have been jealous of all her contributors! That would be a dream of mine come true! I am so happy for you, truly! Thanks so much for sharing! You have some lucky little girls!
AMAZING!!!! Jenny — those are absolutely adorable, I cannot believe you made them. Oh… and I LOVE the photo of the cute hubby & toddler with the butchered haircut! <br />What an awesome accomplishment!
This is awesome! I was so excited to see that you posted pictures of the finished project. This is what every little girl dreams about having. Even Greg thinks it's really cool!! Ana is lucky to have you as a contributor…you are creative, crafty and you totally rock at handling all those power tools! And, as a neighbor I have to say that we don't mind hearing your saws, sanders and
Thank you for the kind words, Mindi! Ana is touring with her book and she's stopping in Utah- it's a 4 hour drive and I'm wondering just how nuts I would be if I tried to make it.
Thanks Chelsea! The whole time I was taking pics for my blog post, I kept wishing you were here to do "real" photographs for me. Miss you!
Celesta, you are so nice! I'm lucky to have you guys for neighbors! It's a good thing that we don't live in a neighborhood with CC&Rs because I would be out of luck. What's going on with your bathroom? The curiosity is killing me- new floor?
This is amazing!
Such a great job! I think I'm going to build, but I can't seem to find the plans for the stairs.
This plan is SO long that Ana and I decided to break it up into parts. The roof, pergola, stairs, and storage boxes will all be listed shortly. She posted the window boxes and shutters today. I will be posting along with "official plan" when she gets to the stairs. I kind of quit taking pictures in the middle of the build so it will pick back up with the other aspects of the plan.
This is a great bed, I just got a new grandaughter this will be her big girl bed. You are so right about Ana White, I tell everyone about her and her website. She has opened creativity that I did not know I had. Cant wait to get this be started.
that is HEAVEN for a little girl!
So awesome:-) I keep looking at the plans trying to decide if it's even in my skill set to do. I've made about 10 of Ana's plans but the biggest ones were the play kitchen and the dream dollhouse… I'd love to try but so scared I'd screw it up! This might seem like a silly question but just how do you get the mattresses inside once it's built?
Haha! Not silly at all; and you're not the first one to ask either. The mattress went in after I had third side up. The side panels are what anchor the bed together, they come apart for moving. When I assembled the bed, I just set up the slats and threw the mattress in before I put the lower wall on. It was easy….and this plan only looks hard because it is so big! If you take it step by
how hard is it to change the sheets?
Not hard at all! If you go to Ana's site and read the plan, you will see that I designed the bed with that in mind. I made the frame larger so there is extra space all around the mattress. No scraped, bloody knuckles from trying to put on fitted sheets! I just pry up the corners, put 'em on, and smooth the sheets. No big deal at all. I noticed how many moms commmented with the same
Hey Jenny I just saw the plans for the stairs are posted. So Cute!
Thanks!
Wow what a great job you did, and I am impressed. My grand daughter would so love this. Thanks for sharing your inspiration with Sunday’s Best – you helped make the party a success!
This is such a great bed. Do you by any chance have dimensions for a full size bed? <br />Also, are all of the plans posted somewhere? I have the bed and stairs but didn't know if I was missing anything. <br />
Hi Kate. If you Google the size of a full bed, you can find the dimensions and adjust the plan accordingly. A twin and full are usually the same length, but a full is 15 inches wider. Make the side panels 15" wider. The side frame pieces, side paneling, and slats are all that will need adjusting. Because of the width, you should consider running a 2×2 rail down the center of both beds for
Thank you, and thanks for stopping by.
Wow that is so cool! Your girls are living a dream 🙂 so fun!
Thank you, they do love their bed…but that hasn't stopped them from writing on it with a marker and plucking all of the flowers out of their window boxes! I guess they don't know how good they have it; I would have KILLED for a bed like this when I was a kid, haha!
I want a bed like that – so sweet and whimsical and amazing!
I just looove your bed! I've been drooling over it ever since I saw it posted on Ana's site. With four girls, I just have to make it 🙂 Except I'm hoping to make it slightly different. I would *like* to make it a loft playhouse that fits a queen on top, so that it would be our visitors bed when company comes (once in a blue moon, no need nor space for a guest room). And I live up
Would it be rude to ask approximately how much its going to cost me to build this bed? I'd love to build it for my daughter but would like to know how much its going to run me before I decide.
I hear ya. Just plan for the built to take 10x longer than you really think it will! Good Luck on the Queen sized version, that will look like a mini mansion!
The price of the bed will vary depending on your materials and finish. I purchased much of the lumber at a discount, and made several trips back and forth to the store here and there for supplies as I went. I would estimate the bed to be $350-400. If you need an exact number, I would print out the materials list on Ana's site and price it at your store. I also built it over the summer so I
Thank You!
That turned out beautiful. I wouldn't mind one of those in my bedroom – I'd just hate to make the bed. LOL – I hate making beds!<br /><br />Happy Thanksgiving & Merry Christmas!<br /><br />Tina 'the book lady'
I just bought all the lumber and am ready to tackle this project, I was just thinking that it would be awesome if I could add a slide from the top bunk down. Any suggestions?
You could add a slide off of the landing to the stairs without altering much of the plan. Or on the opposite end of the bed, just modify the upper left panel to match the upper right panel so there is an opening on either end. I know there are several slide plans on Ana's site that can be added. Here's one: http://ana-white.com/2011/10/plans/castle-loft-bed Good Luck!
Thanks 🙂
Wow, this is absolutely gorgeous! I LOVE this.
About how much did you guys spend alltogether for lumber and everything just an estimate, I would like to do a firetruck house?
We just built a bed based on these plans turned out amazing!! we did it in an L shaped bunk so the kids could have a play area underneath as well.
I have tried to get the plans from Ana but it comes up as a broken link for the pdf is ther another way to get the plans?
You have to send me a pic! I would love to see your finished bed, make sure to post in the brag section on Ana's site too. I'm sure your bed will inspire others to make their own as well!
I am almost finished with building this bunk bed; just need to finish building the under bed storage box trundles, roof and pergola. My girls love it! We made a few changes (made the bed much taller and made stars instead of hearts. The stars were easier to cut out :)) Thanks so much for sharing you plans. I'm working on posting to the brag spot on ana-white.com
I was wondering would it be hard to make this for full size mattresses instead of the twins?
My husband and I are looking at attempting your Sweet Pea Garden Bunk Bed. We haven't started yet. We are in the preparation stages, i.e. reading all the comments, plans, measuring the room, ect. We will be making this for our 2 granddaughters who will be 4 and 2 early summer, so we would like to get going on it and have it done by their birthdays, which are only 2 months apart. I'll
Hi Deanna!<br /><br />Thanks for all of your nice compliments. This bed is so fun, I hope you enjoy building it for your granddaughters! (I still have to post part 3 of the plans, if I ever get around to it). I can't wait to see your final bed, I'll be checking up on Ana White's site for sure!<br />As far as putting the stairs on the opposite end- no issue at all! On the second story,
Thank You, Tina!
You did an amazing job on the bed!! I really want to make this for my two girls but I just have to ask… How the heck to you change the sheets?!? LOL
Thank you! We are very excited about this project and so are the girls (and even their mommy and daddy) so I guess we are committed now, right? Sent a materials list to Home Depot and Lowes and it appears it will cost roughly more than double what you paid, but is still a much safer and better built set when you compare prices of ones available for purchase and a heck of a lot more appealing to
By the way, what is part 3 of the plans? I've read through everything and printed it all out, and it seems very concise and detailed to me, which we were delighted with. It makes me wonder how incompetent we are, if I didn't even realize something was missing. We aren't experienced builders (and that's putting it mildly! LOL)
Oh Deanna! Sorry to confuse you…part 3 is my post that I haven't done yet. The plans on Ana's site are complete! I have been posting pictures along the way for each part of the building process and I didn't finish them on my blog. You shouldn't have any trouble building, I just posted details of the build. Sorry to hear that my estimate is so off! I purchased the bulk of my wood
Whew! I was nervous for a while. Yes, I printed out all the ones on Anna's site, so I have everything. It's OK with the cost estimate. It's still going to be about the same as buying a good set that's premade and plain, so I'm not complaining. Will post pictures this summer. Thanks a million, again!
I seen your bed on Ana's site. I was actually looking for plans on a bed for my nephew who just turned one which we are raising. We just got full custody of him. I LOVE LOVE your bed !!! Fabulous work !! Your daughters have a great mommy !! This bed makes me wish I was a little girl again I would never want to get out of bed LOL. Any hoo a hunting lodge what a fab idea !! I was actually
Jenny,<br /><br />I have started the bunk beds. Just to let you know, my daughter wanted different colors…so we shall see how it turns out. I'm enjoying it and having a lot of fun working on it. I have a couple of questions, if that's O.K. I read in the instructions to use something like Gorilla glue for painted surfaces, but the man at Home Depot said it wouldn't work. What
Jenny,<br />I REALLY REALLY want to build this bed,however i have a problem. The ceiling in my daughter's room isn't tall enough for these dimensions. Is there any way you can help me modify the plan to fit her room? If so, my email is k_rp@rocketmail.com<br />Thank you so much<br />Kim
Can I ask you where you got the flower knobs on the drawers?
I found the knobs at World Market and the pink ones were from Target last summer.
Jenny, this bunkbed is absolutely amazing. What you made for your daughter is priceless, and I know she'll remember you made it for her, for the rest of her life. She'll treasure it always, even when she is too old to use it, and remember what you did and made for her. I remember when I was a child. It was important for my room to be attractive, interesting, fun and unique. It was so
bookmarked!!, I loѵe youг blog!<br /><br />Αlso vіsit mу wеb pаge – <a href="http://picara.jaitek.net/groups/ff/wiki/dc4e7/Gardening.html" rel="nofollow">gardening</a>
I love this bed and my FIL has agreed to make it for my little girl. However, the PDF version isn't working on Ana's site. Do you by chance have one I can download and email off?<br />Thanks,<br /><br />Sher @ fallingdownhouse@gmail.com
Hi Sherilyn, I don't have a copy of a PDF version, but another commenter posted a tip in Ana's site. KevinTH said: <br /><br />"I noticed that too, the 3rd or 4th picture is missing and the pdf converter is bombing out on it.<br />You can print to PDF though. If you don't have a pdf writer just do a google search on "cute pdf writer". Download and install it, it's
Jenny,<br /><br />This is Deanna, and I wanted to let you know I have finished the bunk beds and just posted the pictures on Ana's site, but wanted to tell you how much I appreciate your plans and willingness to share them. You are so creative. I am just amazed at your talent.
Deanna!<br /><br />Your bed looks AWESOME!! Thanks so much for stopping by to tell me. It was so cool to see it on the brag board!
This is Gary.I just built this bed for my 2 daughters. They love it. For anyone who wants to save a little money when building, if you have access to a table saw buy 2x4x8's for all the 1×2 and 2×2's. Just rip them down and sand. At my local Lowes they all cost almost the same and you can get 3 1×2's per 2×4. And they are never very straight when you buy them from Lowes. I think we
Thanks Gary for the tip on the 1×2's. That's super smart! Yes, painting everything as you go is much better than waiting till the end. I spent more time painting than building, even though I pre-painted all my boards.
If I build another, since everyone wants one now, I'm getting an airless sprayer. I spent about 25-30 hours hand painting it and 10-15 actually building.
OMG I LOVE this bed!! I am a stay at home mom of 3, 2 of which are in school. I am wanting to do this for my 2 year old. My 7 year old son has picked out the fire truck bed and my 11 year old daughter is so picky, I think I may just surprise her with something! We are relocating to a different state in a month so I am curious if I could start building this and not put everything together
We want to make this bed for our daughter that will be 3 in January. My plan is instead of a bed on top put a board down on top of the slates and make it a play area. Hoping to start on this project soon. Also, what is the best wood to use for this bed?
Plans for the stairway ?<br />
Love the bunks. I want to build them and have all the plans except the actual bunk beds. The link on Ana White does not work for the pdf. Is there another location I can get them? Thanks for the plans, that helps so much.
I also was wondering about the plans. The plans on Ana's site is broke and it will not download. I would love to make this for my daughter.
Thanks for the tip Gary. Can I ask two questions, about how much did this cost to make and about how much time did it take. Also can someone help me find the plans as I would really like to make this but the plans on Ana's site does not work.
Hi, Alice! Thanks for checking out the bed. I don't know what's going on with the plan on Ana's site. Several people have brought it up and I did message her some time ago about it not being available. Another commenter mentioned on her site that you can go to the plan page and right click with your mouse. It should give you an option to Save as a PDF file. Then you can print that
I am in the process of building this and will be happy to share photos of the finished work…might you be willing to share you sketch up file? I'd like to experiment with color schemes with it and try modifying the stairs as I don't think I'll have room for the steps as designed. Thanks in advance!!!
The Ana white site is down is there anyway you could get me the plans I'd love to build this bunk bed for my kidos !! Please and thank you ;))
I Love this bed and have been searching for a "cabin" style bunk bed to build for my boys. I'm planning on building this between Thanksgiving and Christmas to surprise the boys when they arrive back home from visiting the grandparents in PA.<br /><br />http://thompsonsons.blogspot.com/2014/09/the-boyss-cabin-bunk-bed-coming-122014.html