By Jenny @ Birdsandsoap
Plans by Ana White
The first time I saw one of these cooler stands, I knew it was getting pinned on to
“My Next Build” Pinterest board. It’s where I keep all of my best intentions. I spent some time milling over ideas and then forgot about it for a while.
Then, one day, the stars aligned and I found a sweet cooler deal online at Walmart.com. Twenty dollars for this 48 quart Coleman cooler set, a day-long sesh with Google Sketchup, and a pile of lumber later, and I had the makings of the coolest Father’s Day gift on record.
Let me remind you a little about my man:
What can I say? He gets me. I wanted this year to be special.
Months ago, I requested my husband start saving bottle caps so that I could do something crafty with them. He took this task seriously and began buying every fancy beer he could find so he could “Give me a nice variety of caps” (his words, not mine). I wasn’t sure his liver could take it, but he isn’t one to back down from a challenge. Everybody has to contribute something around here. Thanks, hon.
This cooler stand is made out of basic lumber, has an attached drain, and optional wheels if you need it to be mobile. I chose a blue colorwash for a vibrant look and an inset panel with grouted bottle caps to make it fun. I would keep this out of the weather as the printing on the caps will fade over time if it is left in direct sunlight. I am giving specific measurements for this particular cooler. Of course, you will have to custom fit your cooler stand if you use a different size and your materials list may vary.
A note on measuring your cooler dimensions: This can be tricky with all of the rounded corners and sloped edges. Measure your cooler at it’s largest diameter; that is usually around the top rim. To get an accurate height measurement, I measured from the ground up, if you try to measure just the surface of the cooler, those curvy edges can throw things off. Level your tape from the ground and go up from there.
Preparing your cooler:
You want to get the tightest fit possible in the stand. This requires a little disassembly and some cosmetic work.
First, I had to remove the lid from the cooler and get rid of the hinges since they would be going in separate cases on the finished product.
Easy peasy. Unscrew the hinges and turn to pop them out. Anybody else notice that this hinge looks like it is in pain?

Next came removing the handles. I popped the handles out of their brackets and removed the pins. All that was left were a few nubs- Nothing a hacksaw can’t fix. Like buttah. I also removed the cap on the cooler drain.
Now that I have a smooth exterior and a separate lid, I can start building.
This 48 quart cooler measures 13×23 3/4“ in diameter. I added a quarter of an inch each direction, allowing enough wiggle room just in case the cooler is warped or needs some finagling to get it into place.
I started with the front and rear frames first. The legs are 35” high; attach them together with 24″ horizontal frame pieces using 2 ½ pockethole screws.
The center brace is going to be the height of the platform your cooler will rest upon. Take the height of your cooler MINUS ¾” inches and mark for your center brace. The cooler will sit inside just above the frame, but once the top trim piece is in place (it is ¾” thick), it will sit flush with the top of the cooler.
I attached the bottom brace six inches up from the ground. This gives plenty of space to sweep a broom underneath when I am cleaning the patio. A girl’s got to think ahead!
Here is the assembled front frame. This is the interior view. Attach the pieces together with 2 ½” pocket hole screws so they are on the inside.
Build two of these.
Attaching the side pieces:
I went ahead and measured and cut 2×4’s down and sanded them all at once. I used the first cut board as a template to mark all of the others for accuracy. I like to do things in an assembly line fashion as I think it makes me faster. Not really, because I have to break every 20 minutes to parent. These types of projects take the Average Joe a weekend to complete.
Me?
Nooo-ho-ho; they take a month with the kiddos on deck.
The 2×4’s are super sturdy and will support the cooler and bottom shelf flawlessly. I attached them with pocket hole screws on the undersides. If you don’t have a
Kreg Jig yet, get one now! This tool has changed my life!
The side frame pieces are coming together and my five year old has discovered how to paint with her sidewalk chalk. I too, painted as I went. I really wanted to try Minwax’s Indigo Gel Stain for this project, but they didn’t carry it at my local Lowes (BOO!). So instead, I used a colorwash effect with a sample jar of
Valspar’s Mountain Lake:
I watered down the paint to create a wash. It is a matte effect that still lets the woodgrain show through a little. I started with a light coat, and then added additional coats for a more vibrant finish. I painted this entire project with a sample jar I bought on clearance for a dollar. Woot!
Our cat, Prince, needing some attention. Pet me, pet me!
Once I had all the shelf pieces assembled (glued, screwed and checked for square) I attached the rear frame piece and it finally came together. At this point, my husband had no idea what I was making him and I made him help me hold the boards straight while I glued and screwed them into place. Having a helper for this part was a lifesaver.
So while we are working, he is trying to guess what I am making:
His first guess was a baby changing table. Nope.
“Well, it can’t be for me because I would never pick that shade of blue.” Thanks.
Next he guessed a barbecue stand. What?
Third time, I actually brought the cooler out of hiding, placed it in the top, and got all excited because I just knew he had figured it out.
He guessed a planter box. Really?
Finally, after I put the lid on top and performed a quick game of Charades demonstrating what it looks like to use a cooler, I got an “…Oooooh, it’s a cooler box.” By that time, the novelty had worn off.
Whatever. His work was done. Leave me to my cooler building, Babe.
I dry-fitted the cooler and it was nice and snug. Hallelujah!
Next came time to fill in the side panels. The side panel is made from (2) 1×6 pieces and a 1×3 in the center. I measured out my openings, cut them to fit, and pieced them in there one at a time. I sanded the edges to accentuate the planks. If you butt them up tightly together unsanded, they will just look like one board when you are done. I used wood glue and a brad nailer to hold everything in place. I nailed the boards in at an angle from the interior, so the outside is nice and clean. The boards are flush with the inside frame edges. I also glued up all the seams on the inside.
The rear panel is made from (5) 1×3 pieces and (2) 1×6 pieces. I left hairline cracks between the boards for an even fit across.

The front panel is made with a 1×6 piece on each end and a 2×2 piece to frame out the center panel section.
The top trim:
The top trim is built out of 1×3 material. I measured it to be ½” larger all the way around the exterior of the frame to give it a nice lip. Do this by adding 1” to the length and width of your cooler box. The corners are mitered, glued, and secured with a brad nailer.
Next, I took my cooler and put it upside down on top of the trim piece. I measured on each side, making certain the box was centered over the frame.
Mark with a pen all the way around the edge. This will give you the tightest edge between your cooler and the top of the frame.
I clamped a scrap board to give myself a nice straight edge for a guide and used my jigsaw to carefully trim out the interior edge. I am notorious for chewing things up with a jigsaw- so having a guide was a necessity. I went very slow around the corners, and then sanded all the edges for a nice, smooth finish.
Once you have finished the trim, you can fit your cooler into place. Looking good, I stained it up with
Minwax’s “Early American” (my all-time fave!). I clamped the top piece to the frame and glued, using brad nails toenailed in from the underside of the frame to secure it in place. The cooler and trim are totally flush. I dryfitted the cooler several times through the building process to make sure everything was aligned.

For the front panel, I kicked my craftiness into full gear!
First, I measured a scrap of ¾” plywood to fit the space, pre-drilled pocket holes on to the back for 1 ½” pocket screws and came inside for a cool drink and some quiet time. I gathered all of the bottle caps my husband has so painstakingly amassed, and began to place them on the board. I used staggered rows of caps, and when I got to the far edge, I had to break out the hammer to smash one side of the caps so they would fit within the board space. There are all kinds of glue out there. I happened to have a hot glue gun handy. It was quick, but probably not the best application. I had to keep regluing caps when I finally mounted the board into the stand.
I showed my husband my handiwork and I swear he almost teared up. He started pointing to caps, saying “I remember when I drank this beer” “…and this one.” Geez.
See ladies? This is the gift that keeps on giving.
With the front panel in place, I mixed some leftover grout from our kitchen remodel and grouted between the caps. I love how it turned out! I don’t know how it is going to hold up over time, but it looks awesome right now!

Fitting the drain:
The drain on this cooler is roughly ½” in diameter. I purchased a short length of clear vinyl tubing measuring 5/8” around with a 1/2” interior diameter. It was still a little tight to fit over the drain spout, but that’s good right? I stretched it out with needle-nosed pliers, fitted it over the cooler drain, and secured it with a cable tie. I used a piece that was about 1 ½” long.
With the cooler side of things assembled, now I fixed my attention on the stand.
I measured for the drain on the correct side. Transferred my measurements to the side of the stand and used a
wood boring spade to cut out a 1” hole for a coupler.
The ½” PVC coupler I used has one male and one female end and was about twice as long as it needed to be. The female end is what I wanted to attach the hose bib (cool brass drain spout). It only needed to be long enough to fit into the wood and give my spout something to grab on to. I used my jigsaw to trim it down to around ¾”, the depth of the 1x material, and glued it into place for a tight fit.
It might take some time to get the cooler shimmied into place. I had to be careful with the vinyl hose attached to the drain. I carefully folded it upward, then slowly lowered the cooler to align the drain. I used a screwdriver to poke the hose and fit it through the coupler. Once it was in place, I screwed
my brass hose bib into place, and Voila! I had a working drain!
Lid time!
The lid is framed out with 1×2 material for an interior casing, then a mitered 1×3 to give a nice border and allow space to fill the top in with paneled boards. *Please read all of this section for an important note on board widths.
I measured and built a simple frame with the 1×2. Glued and nailed it together:
Then I measured and built the 1×3 frame around this. It is mitered with 45 degree angles on each corner. They are not attached together at this point
The outer frame gets filled in with more boards. I used (4) 1×6 pieces and (1) 1×4 scrap I had in the center.
They fit perfect without having to trim anything down. These are nailed and glued into place from the underside too.
Did I mention that this gave me the perfect opportunity to try out my new
Mother’s Day gift? My sweet husband got me an
orbital sander! That’s right, using my Mother’s Day sander to build a Father’s Day present.
Ah, the irony. I love it!

Once the top of the lid is finished, you can attach the 1×2 frame to the interior of the lid. I glued it in there and it fit snugly. Paint it up and it is ready for a handle and hinges!
So how do you attach the lid?
Good question. The plastic lid itself will not rest flush with the bottom edge of the wooden lid. It needs to be bumped out a little so that when it closes it will fit tight to the cooler bottom. You can glue shims to the inside of the wooden case to make the plastic lid bump out and sit flush with the edge of the lid cover OR you can run your 1×3 and 1×2 frame pieces through a table saw and shave off a quarter inch BEFORE building the lid and it will be PERFECT. You choose.

I wanted my cooler lid to stay put inside of it’s fancy wood cover, so I decided to try Gorilla Glue. Not only because I won a whole prize pack a while back for my
Sweet Pea Bunk Bed project, but because my neighbor guy told me that it expands 3-4 times it’s size while it dries and it adheres to various materials. That’s just what I needed; glue to get in those cracks between the wood grain and the textured plastic cooler lid.I ran a bead of glue around the cooler lid and a few lines across the surface and clamped the plastic lid to the lid case to let the glue dry. After a few hours it was as snug as a bug in a rug.
With all of that assembled into one piece, you can fit your lid on the cooler and mark for hinges.
The hinges I used are
flush mount cabinet hinges I picked up at Lowes for just a few bucks. With the lid attached, I marked them 4” in from the edge. You will find that you need some type of stop so your lid doesn’t just snap off. All that wood gives it a nice weight. I used two eye hooks and a length of chain attached to the side of the lid and top trim piece to keep my lid from opening too far.
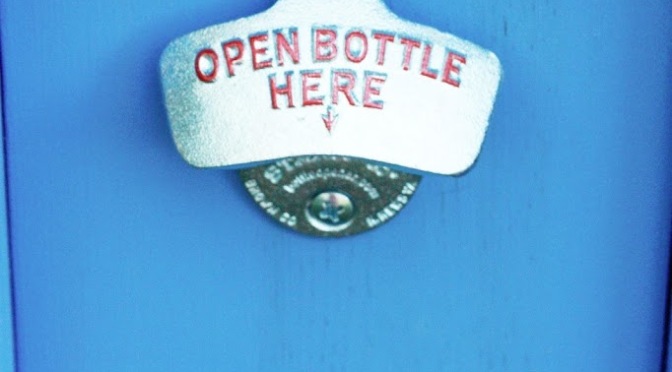
I picked up a
bottle opener from World Market to mount on the front.
I found a nice sturdy handle that is large enough for a man’s hand. A clean look to finish things out. It’s coming along nicely. Now we need a shelf, a pull handle, and wheels.
I attached a small shelf to the drain side because the pull handle to lift the stand will go on the left. I made two brackets out of 1×6 material and cut out a decorative design with my jigsaw. They are glued and nailed into place with the shelf nailed to the top.
The shelf is made from 12” 1×4 scraps glued together and trimmed out with 1×2’s that are mitered around each edge to frame it nicely.
A simple pull handle I found at Lowes for less than $4 near the gate hardware:
Next are the wheels-this is the last step!
I used (2) 2 ½” caster wheels mounted with pins to the underside. This was the easiest part of the entire project. I measured the height of the wheel and recorded the height measurement onto my legs, using a carpenter’s square to keep my lines straight. My wheels measured 2 ¼” below the pins, so I used my circular saw to cut both legs on the right side of the cart. I adjusted my saw to 2” and was able to cut all the way through in one pass. You want the wheels on the right side of the cart because if you should need to tilt the cooler for draining, the handle to lift it will be on the left opposite the wheels.
I drew an “X” from corner to corner to find the center of the leg, then I drilled hole the same diameter as the pin deep enough for the wheels to fit.
These pins have a spring around the barrel that gives a snug fit. I used a hammer and gently tapped the wheels in until they were completely inserted.
I plan to put a clearcoat over the top of all surfaces in a couple of days. Anybody have any tips to protect the bottle caps from the sun? I’m worried about them fading over time. Curious if there is a product out there I don’t know about.
Now all I need are some ice-cold drinks to refresh my man on a hot summer’s day…
What better drink for the World’s Greatest Dad than one with his name on it?
Sam may not have been able to guess what I was making him, but he is certainly not complaining now!
Happy Father’s Day to the best Dad and greatest husband a girl could ask for!
Linking up and partying here:


 Next came removing the handles. I popped the handles out of their brackets and removed the pins. All that was left were a few nubs- Nothing a hacksaw can’t fix. Like buttah. I also removed the cap on the cooler drain.


 Fitting the drain:


 Once the top of the lid is finished, you can attach the 1×2 frame to the interior of the lid. I glued it in there and it fit snugly. Paint it up and it is ready for a handle and hinges!


Beyond clever! We're moving cross country this summer, so I'm not making it for Dad's Day, but I will definitely make it for another occasion!
So I might have to try conquering this for my step dad for Christmas. They just got a river lot this year and even though they have a full-size refrigerator, this is cute. Have you thought about trying that epoxy stuff that they make bottle cap necklaces out of? That is what I think I would use for the material I want to decorate the insert with. Great job!
Hi Jody! Yes, I contemplated epoxy. I thought it would cool if I embedded the caps in resin, there are tons of tutorials online for the how-to's, I've seen really neat cocktail tables with bottle cap tops….only question: Do you know if it works against sun damage? I'm still concerned about fading and wonder if any type of resins protects against that.
Yes Megan, this cooler belongs on every patio!
This is absolutely amazing!!! I don't want one…I NEED one!
Ummm, you totally blew our Fathers' Day out of the water!! That is totally AMAZING!!!
I can't even believe you did that, it looks awesome!!! I am featuring you on Thursday! I also got your button on my blog 🙂
LOVE it!
super cute, and ethan and i had a good chuckle over your "hey girl"! 🙂
You are amazing, this is SO awesome!!! Great job!
A-MAZ-ING! I am sure I am not the first, but had to "pin"!
Super project! Thanks for the great tutorial!…and yes, I'm pinning it too!
Woohooo, this is awesome!!! Way to go girl! Now Matt is going to want one of these … hmmmm
I pinned this to my AWESOME board! Cindy
You are so amazingly talented….this is absolutely awesome! Sharing, pinning…loving!
This is awesome! Love it and am saving for a future project down the road.
Thank you, you do need one. It's so nice for the patio.
Thank You!Sam joked that this project was more for me than him because I was getting so into it.Hopefully, the excitement will still be there on Father's Day. I should probably fill it up.
Thanks! I'll stop by and see!
Thank You!
Thanks! That "Hey Girl" still makes me laugh, because it's so true!
Thank's Mindi! Glad you stopped by!
Thank You!
Thank You! Sometimes I wonder about my tutorials…I could talk forever, but I just hate to leave out details.
This is a great addition to the patio. I can't wait to use it on the fourth! Thank You!
Thank you, I am honored!
Thanks Mary Beth, glad you stopped by!
Thanks! I'd love to see yours when it is done!
OMG!!!Love this!!! Can't wait to try it out!! Maybe it will get done for fathers day…probably not, but I am gonna give it the old college try :-)The cooler I have doesn't have the hinges on the outside, and the lid is quite a bit taller…not sure what my plan of attack is going to be quite yet 🙂 Wish me luck!!
What a great idea! My husband would love this!!
Wow! That is Awesome!!!!
I think it's awesome that you built this for father's day with your mother's day gift.<br /><br />Forget making one of these for my husband. I want one of these!
Just an awesome project! Nicely done!
This is fantastic! Going to build it Saturday night! (my first build project solo!) do you by chance remember what your overall cost was to make it? Debating if i want to make two while I'm at it… Thanks for SHARING!
Beyond Creative! I love it! Nice Job!
This cooler is fantastic! Forget dad, I want one!!! Seriously, well done and my hubby would love it.
Jenny! What an amazing handywoman you are and what an amazing cooler! Love it, Pinned it. :)<br /><br /><3 Christina @ I Gotta Create!<br />Wildly Original link party is open.
Wow. Is all I can say about this cooler box. It's so well done down to the small details like the spout and bottle opener. I will definitely be making one of these. <br /><br />I wonder if you can use some kind of deck sealer to protect your bottle caps. You'd have to read some product labels, but they are designed to prevent stain from fading, so who knows? Or maybe since you used grout,
Honey, I've fallen in mad love with this project! You are brilliant! I'm pinning and sharing on my FB page & tweeting, everyone needs to see this!!! xo<br />Robin<br />All Things Heart and Home
What an amazing gift! And your tutorial is great. I'd love if you'd come and share at Inspire Us Thursday at Organized 31. http://organized31.blogspot.com/2013/06/inspire-us-thursday-link-party-3.html
I'm glad he took one for the team and drank all the beer! What a sacrifice! My hubby would probably be up for the challenge too!<br />I love everything about it! It's GENIUS!!Totally pinning this!
Good luck!<br />
Thank you!!
This is freaking epic! Forget the hubby, I need this for myself! You did such an awesome job!
Keri, I did look into the deck stain section when I was at Lowes. The associate showed me that and it does have some sort of UV blocker…just wondering if it works on the grout and caps. I am going to look at the auto parts store because I'm wondering if there is a type of automotive clear coat that would protect against fading and adhere to metal better.
What a guy- I didn't even have to twist his arm! Thanks for stopping by~
Thank You! This was a really fun build!
Thanks for stopping by, I linked up! Thank you!
Thank you for the compliments and the pin!
Thank you!
I really enjoyed building this. It was a fun project all the way though. And it didn't take me a lifetime like most of my other projects.<br /><br />Definitely make one just for you!
Thanks!
Thank you! I'm so glad I finished it in time for Father's Day- that never happens!!
I bet he would! If you ever make one, be sure to send me a picture!
Thank you!!
What a thoughtful and generous gift for your other half! The only thing I would add to this is a box to catch all those awesome bottle caps for your next garden project! Great job btw.
What a great project!!! It turned out beautifully, I'm very impressed. Looks great, and what a nice gift! ~Angela~
This is so awesome, I want one!
Jenny, You totally inspired me to make one of these for my husband for Father's Day. He loves it. I could not have done it without your post…I had you up on my computer all weekend combing through the photos…trying to make a cooler chest that wasn't a disaster :-). Great post, hope you enjoyed your Father's Day!! Shawna
I'm off to go check it out!
Yes, I think I will hang a little pail or something to catch the caps. Thank you!
Thank you!
Wow! This looks so professional. Love it! laurie
That looks so awesome! My husband has been wanting one of those I have already pinned your post. Great job.<br /><br />Tammy @ The Colored Door
I'm loving this project…so much in fact, I started building the same thing months ago and then lost steam. Where I was running into trouble was attaching the cooler (I bought the same size one and brand too) to the faucet on the exterior. I'm going to go back and read that section again, but can you explain in greater detail how you got those to link up? Thanks so much!!! I'm
This is awesome! Just featured it on Craft Gossip http://homeandgarden.craftgossip.com/diy-cooler-stand/
Holy creativity! I am bowing down to you, Wayne's World-style. The cooler came out so fantastic! Love all the little details, and the color too. Thanks so much for sharing!
You might be, quite possibly, the best wife EVER! This is fabulous. I don't have a hubby but my sons are both husbands and dads. They tease me about my power tool collection (especially the compound miter saw!) but if I made them each one of these, they might stop making fun of their mother. Thanks for such great instructions (in addition to those provided by Ana White).
PINNED!! I'd love to have you share this at What to do Weekends Party, also. It might be a bit more than a weekend project but it's SO original!! Love it Linda<br /><br />Following, too.<br /><br />http://www.craftsalamode.com/2013/06/what-to-do-weekends-25.html
Fabulous project- great job!
I know you already saw that I featured this on my blog today, so I'm just stopping by to pin it and say thanks again for sharing! Seriously, I LOVE this cooler stand!
Hi Tracy!<br /><br />If you look at the pics on that step, you can see that I just attached a vinyl hose from the cooler drain going into the plastic coupler that is mounted in the wall of the box. With the brass hose bib screwed into the coupler for a tight fit, the vinyl hose just drains right into the brass fitting. Does that help?
Thank You! I've been getting great traffic from your site- totally awesome!
Thanks a bunch!
I think your sons would say they have the best mom in the world!
Thanks! I'm all linked up!
Thank you!
Thanks, Jessi!
This is so cool! Love it! So glad I saw it featured at Home Stories A to Z. Sharon
This is so amazing!! I saw this on Craft Gossip and LOVE IT!! My husband would keel over if I ever made something like this for him. 🙂 Great job!!<br /><br />Jenn<br />http://www.endlesslyinspired.com
Thank You!
This was a fun project and it was great to use for our Fourth of July barbecue!
How much did this project cost total?
What was your water/paint ratio? Also what is under your hinges? It looks like you have something mounted between the hinge and underside of the lid.
Hi Jeremy!<br /><br />Hmmm…water to paint. I just kind of dumped it in a cup and mixed till it felt good. I'm thinking 1 part water, 3 parts paint. Maybe a little more water, I just played with the coverage till I liked how it looked.<br /><br />Ha! You noticed my error! Toward the end of my project, after much frustration, I realized that my Miter saw needs recalibrated. I've been
I am going to try the wash with a gray.<br /><br />I understand the minor slip up. I may make all miters on the table saw, but the miter saw is faster so I may get lazy and just use that.
To protect the bottle caps (or any paint, really) from UV damage/fading, try any spray on clear UV protect/ UV cut finisher, Krylon makes one, as does Testors. There's also a Mr. Super Clear UV Cut from the Japanese DIY/hobby scene that people swear by. It's likely that any of these would help the color last 🙂
This is terrific. One question: will it work without the jig sawing? I don't have one and when I use one I'm very…unskilled at it, to say the least.
Thanks for the tips Pookarah! I'm going to look into those for sure!
Hi, Allen! You should be able to do this project without the jigsaw. It's used to make the curved cuts around the cooler trim piece and on the decorative cuts for the shelf brackets. I'm sure you can improvise on the lid trim and skip the curves on the shelf brackets. Good luck!
You might try the Rustoleum liquid repelling treatment. Here is their website: http://www.rustoleum.com/product-catalog/consumer-brands/neverwet/neverwet-kit/<br /><br />I am going to attempt to build this, but instead of for a cooler, I'm going to insert two 5 gallon buckets and store my wood pellets for my Traeger Grill and it will serve double duty as a table for the grill. Thanks for
Thanks, Carol! I'll look into it. I think that is the same product my husband was just telling me about. Good luck on your project, I hope it turns out great!
I finished my chest! I was ill for a while, so it took me longer than planned, but it's finally done and looks fabulous. Thanks for the plans and the instructions!<br /><br />You can see pictures here https://www.facebook.com/photo.php?fbid=1457259694509548&set=o.106695604520&type=1&theater
Ok you just made me want go and buy all the tools just so I can make this 🙂 great job, best one ive seen
Ok you just made me want go and buy all the tools just so I can make this 🙂 great job, best one ive seen
I'm definately going to build one for our new deck! The only change I see I want to make is a small box under the bottle opener to catch the bottle caps. Great Job!
I really like this. A chance to use my Kreg jigs, and build something that we've wanted but felt they were either schlocky if we could afford it, or crazy over priced for good quality stainless steel. Two questions/concerns: 1) Wouldn't the drain back up into the wood box if you ever closed the brass hose bib valve? and 2) Wouldn't those hinges rust fairly quickly in the outdoors?
Thanks for stopping by! Yes, a catch for the bottle caps is a great addition!
Thank You! Per the drain comment, I siliconed around the vinyl tubing where it feeds in to the PVC coupler. I tend to keep the drain open anyway, since I don't like my ice getting all waterlogged. So far the hinges are working out, I have an awning over my patio that protects from the elements, but they may need replaced down the road if rusting becomes a problem. Good questions!
Thanks, Claudia!! Post a pic on my facebook page when you are done, would love to see your finished work!
Jenny – this is amazing. Absolutely, positively, amazing. We bought a house last year with a pool and do a lot of backyard entertaining. The standard coolers are nice but we've wanted something a bit more upscale. We keep eyeing these at Market Street when we go and buy groceries, but they wanted something like $199 for a college themed one. Also looked at Craigslist for a used one and
This is my favorite tutorial for a wood cooler stand!!! Thank you and Ana for the help with the tutorial/plans/cut list.<br /><br />Did you ever find a sealant/UV protector for your bottle caps? I have a growing collection and a husband that loves his cold drinks. I'm adding this to my "to-do" list. 🙂 <br />
Your plans for the cooler were great. My husband made the cooler but painted his red with a coke a cola sign on the front. It is absolutely beautiful. But some of the products you suggest to use did not perform well. The gorilla glue for the lid did not stick to the plastic of the cooler lid. Yes glue was all over the lid and did let it set for days before opening it. After a couple of uses it
I was thinking the same thing.<br /><br />Is the vinyl hose just set into the shut off valve? and if so does it not leak water back inside the wooden box??<br /><br />I am sure I can rig something up just looking for a but of clarification.
I know this is an old post but I just stumbled upon it! Could you tell me what color paint you used?
Yep! I'ts Valspar's "Mountain Haze."<br />
Hi Wendy, sorry it has taken so long to reply. I don't know what advice I can give about the glue. This is the secoond season using my cooler and the lid is still holding great. I have had ZERO issues with the Gorilla glue not holding. Maybe it wasn't making good contact and needed more clamps when you tried to glue it in place?
I still haven't found a sealant, but I store the cooler under an awning so the caps are shaded. Still looking great the second year.
Thanks so much for the compliment, Melvin!
Hi I can't seem to print out the step by step directions because the link isn't working. Do you think you could post it again on here?