
This post was sponsored by DecoArt, but the opinions and clever quips are completely mine.
I finished this painting project just in the knick of time! With our baby due in less than two weeks, I added this to my ever-growing list of projects to complete before we would be holding our baby boy. And wouldn’t you know, this set of nesting tables was a fairly easy project, perfect for this nesting mom!
I LOVE nesting tables. I love how they look, I love their versatility, and I love how add a little more dimension to a space. When I happened upon this set over the summer at the thrift store, I was thrilled. I’ve been on the hunt for a set for years!
But they were super ugly.
Painted in a matte black with stickers all over them. They were dirty, wobbly, and gross. Upon closer inspection, I realized that underneath that horrible finish was solid hardwood, and they were wobbly only because of loose hardware. An easy fix. I decided to pick these up, and for just over twenty dollars, I finally had my very own set of nesting tables.

I spent my summer busy with other plans and just couldn’t get to finishing them, and by the time fall rolled around I was ready to check them off my list. Thanks to the folks at DecoArt, I had the opportunity to try out their new Americana Home Decor Chalky Finish paint.
This was my first time using paint with a chalk finish and to be honest, I wasn’t sure if I would like the end result. I know that chalk type paints have been all over the blogosphere for quite some time now, but I was reluctant to try them because a chalky surface just didn’t sound appealing to me. My mind immediately goes to fingernails on a chalkboard! I envisioned the dusty, rough surface on my furniture. I prefer latex paints on furniture because it cleans easily, and I assumed a chalk paint would just leave me disappointed.
I’m happy to say that I couldn’t have been more WRONG! Not only was this paint a pleasure to work with, but the wax finishing creme left my tables velvety smooth. I can’t believe how smooth the final finish is with these paints!

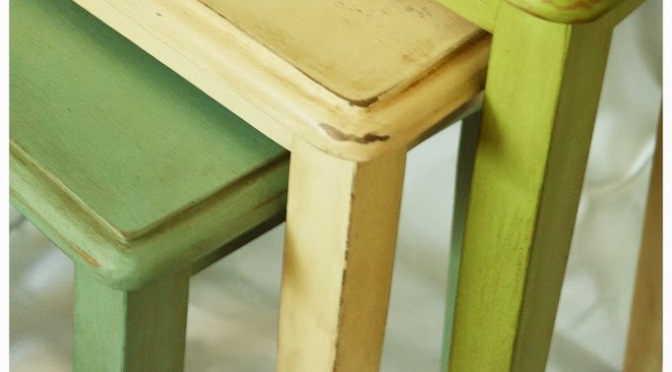
As part of my recent plan to “De-Brownify” my living room, I wanted to replace one of my current stained wood end tables with this set of nesting tables in an attempt to add a little color to the space. I received a full line of color samples of the Americana Decor Chalky Finish Paint and picked out a few that I loved. The first is my all-time favorite, called “Vintage.” It’s the beautiful dusty blue shade that I painted the smallest table. The middle table was painted with the color “Whisper,” a creamy white, and the largest table was painted with a shade of my own concoction…The shade of green I achieved was a mix of three colors, and it is just what I was going for.
The new Americana Home Decor Chalky Finish paint is available online at Home Depot. You can have it shipped straight to your front door, or you have have it delivered to your local Home Depot and pick it up for free! How easy is that?
I’ve really been into the two-toned finish of paint with stain lately and this project is another example of that look. I first sanded down the tables with my orbital sander to the wood surface, then stained with Minwax’s Early American to darken up the wood tone. I let the stain dry overnight and began painting the next day.
Next, I used my Cricut with the “Botanical” cartridge to make three vinyl stickers. Each is a pretty botanical design, with the center table decal including our family name and the year of our marriage. I wanted to add a little character and this was a fun way to personalize things a bit too.
On the first table, I used an old paintbrush to apply the chalk paint. My bristles proved too stiff and I changed to a finer bristled brush for the other two tables. This paint is very creamy in consistency, it brushes on smooth and dries to a matte finish. The chalky finish paint requires no priming and can be applied directly to any surface. The lighter colors took an extra coat on my dark surface, but they went on very smooth. Once the paint was dry, I peeled the stickers to reveal the design. It was like opening a Christmas present!
Oh, and it sands like a dream! One thing I noticed right away is how different this paint is when sanding compared to a latex paint. Usually with latex, when you sand off the top layer, it is darker underneath. It shows the variances so easily when you are distressing your piece that sometimes it actually subtracts from the overall look of the piece. This chalky finish paint sands evenly, layer by layer, and it is very forgiving. The paint produces a fine dust when sanding, but I used a damp cloth for clean-up and it worked well.
This is the part that got me nervous. After painting and sanding my surfaces smooth (plus a little distressing on the edges), I had three very cool looking tables and I was a little skeptical whether this finishing wax was going to preserve the finish and provide protection and durability. You can skip the wax and just apply a varnish to seal the piece if you like, but I was really curious how this wax thing was going to turn out so I just went for it.
The wax creme (I chose the dark brown) is very smooth with a consistency like yogurt or heavy cream. I used a folded up paper towel to wipe on a thin layer, then used a dry terrycloth towel to immediately buff the wax into the surface.
This wax just becomes one with the wood!
Once I was done rubbing the wax into the table, the final finish was like velvet! My table surface had a light sheen and a hard coat like I had used varnish to protect it. Not only did it feel great, but it looked awesome too. You can see in the pictures that the dark wax gives a beautiful antiqued finish to my pieces. I just love it!
Needless to say, I am impressed. I no longer have a fear of chalky paint or any doubt whether it will retain it’s finish for years to come. This was such a fun product to use and it gave me expert results. And talk about easy, I can’t wait to try it out on more pieces!
For more chalky finish project ideas, check out decoart.com/chalky finish.
Linking up and partying here:
Home Stories A to Z
Flamingo Toes


Ooooo, I need a set of those nesting tables! Love your insights on using those chalky surface paints … can't wait to try them out!
looks great – can't wait to try these!